This burner is of my own personal design and as you can see it works very well! It doesn't need any reducer to form a venturi like the "Reil burners" (in fact there's no venturi!) Nor does it need any bushing or coupling like the "mongo burner" series. I think it might be the simplest blower-less propane burner design ever!
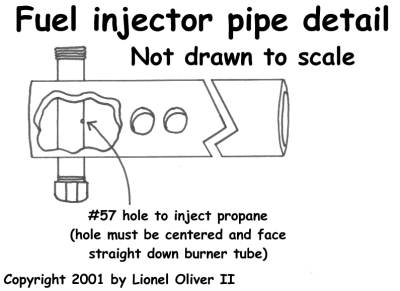
No hidden parts. Just a 7" long piece of 3/4" steel pipe with a row of 3/8 inch holes drilled in it (the holes extend through both sides of the pipe). The fuel pipe is 1/8" steel pipe with a #57 hole drilled in the center. The #57 drill bit is the #57 drill bit is .0430 inches diameter. In metric it is 1.092200 millimeter diameter here's a picture next to a penny for comparison. The flare is a rolled up piece of sheetmetal. Thatís all there is to this simple design! I call it the "upwind" because the propane is injected upwind of the air intake holes (hey, that makes sense).
Here's a look at the burner without the flare. The extra set of holes drilled on the side of the burner were just for experimentation and don't seem to effect the burner whether open or plugged so I consider them unnecessary. Notice the setscrew location.
Here are some of my flares. Nothing but rolled sheetmetal (one is made of a copper reducer for the prototype burner). The flares stay on merely by friction. I made a cardboard template (learn how to make them here) to trace onto the sheet metal so rolling flares is simple. Now I can just look at a flare and judge if it has the right taper!
As you can see the end of the flare gets very hot since the flame burns inside it.
Burn baby, burn!
Turn off the lights and you can really see the different temperature cones. The burner sounds like a propane soldering torch just louder (and has a much bigger flame!).
To ignite the burner I open the propane bottle's valve slightly and hold a lighter under the bottom air intake holes until it gently ignites. Since the regulator is preset I just slowly open the bottle's valve to full tilt and the flame shoots into the flare making that nice cone and creating a smooth sound of rushing air.
Here you can see clearly how to install a setscrew by drilling and tapping a hole. Filing a small flat spot on the fuel injector pipe will help the screw hold it straight. I actually prefer to put small welds where the fuel pipe enters the main pipe.
The drawings below in addition to the above pics should be all you need to build the "Oliver-upwind" burner.

Here's a tip from a site visitor if you can't get a #57 drill bit...
I have a tip for you. I built your upwind burner. I had no way of drilling the #57 hole. so I looked around the garage and found a Carburetor jet out of a motorcycle that was the perfect size, all I had to do is drill and tap the hole for the jet. It works really good, I thought this might come in handy if some one was in the same position as I was on drilling such a small hole. I also hooked a pressure gauge up to mine and it does work best around 20 PSI. Thanks, Dan G.
- Since no threads are needed on either side of this burner it can be built from any scrap steel pipe even electrical conduit!
- I've only been able to get this burner to work with a #57 drill bit. I've tried #58 and #60 (which are smaller) but the flame would stay inside the burner pipe making a ruff sputtering burn instead of entering the flare and burning smoothly like a propane soldering torch.
- The air holes are simple to drill if you "step drill" them. This involves starting with a small hole then gradually increasing drill bit sizes until you reach the desired size.
- The holes to hold the 1/8" pipe are drilled 3/8" then widened with a round file 'til the pipe just fits.
- Tests showed little to no improvement when a venturi was placed on the back of this burner.
- Since so little air is pulled in from the back of the burner (it even burns with the back plugged) a larger diameter fuel injector pipe (such as 1/4") can be used if 1/8" isn't available.
- I don't currently have a pressure gauge to tell me the psi of the propane, but it seems to burn best when my 0-30 psi regulator is in the middle of its range. So I'm hypothesising that it works best between 10 and 17 psi. Of course a better flare may increase this range.