The tailstock itself is done but there's still some finishing touches to add to it (namely the tailstock ram) I plan to cover that in part 7; finishing touches. Aug./26/2002
 Metalcasting |
The tailstock itself is done but there's still some finishing touches to add to it (namely the tailstock ram) I plan to cover that in part 7; finishing touches. Aug./26/2002 |
|
Need the cold rolled steel for your lathe or other projects? I got mine online from this company
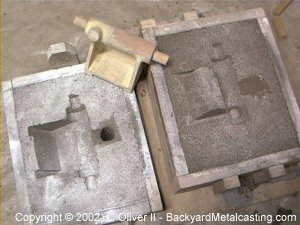 |
Here is a picture of the tailstock pattern and a perfectly usable sandmold. I however didn't use this mold to cast the tailstock because I didn't have any cores at the time (this pic was taken before I cast the pulleys). I just put this pic in because it shows the pattern. I used a drillpress to insert dowels into the "barrel" section to form the core prints. By the way, this mold is made with the greensand I mixed on this page! The mold I used to cast the stock is the one in the photo below... |
This pattern was a lot easier to make than I expected because I thought I'd need a wood lathe to make the core prints on the "barrel" portion of the tailstock. D. Gingery mentions how he used a table saw. I have neither machine that I can use so I thought I'd have to rig some sneaky homemade chuck and temporary tailstock to turn the pattern from wood on this lathe. However the drill press was accurate enough. Glad too... saved a lot of time. However I did design and cast a sneaky little 4-jaw chuck. Take a look at it in use making the faceplate pattern! |
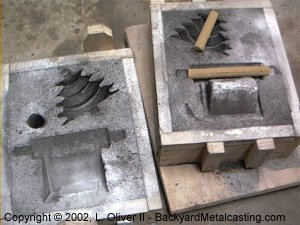 |
Okay, here is a picture of the tailstock mold with the core in place. You'll clearly notice that there is another cavity in the mold. I looked at it like this; I've got some space left in the flask so I might as well slap another pattern in there... So I decided to cast a small stepped pulley (extra pulleys will probably come in handy sooner or later). The pulley is the size specified for the Gingery shaper project. The tailstock core is shorter than the core print since it came from my pulley making core box which makes smaller cores. But it was long enough (barely). |
The hole you see is the sprue hole for the tailstock, the pulley's sprue is not visible in the picture. |
|
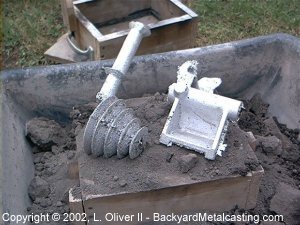 |
As you can see from this picture both of the castings came out very well (I love it when that happens). Each casting has its own sprue because I treated this like two separate molds rather than using one sprue for both patterns. I think there's less chance for a shrink cavity that way. |
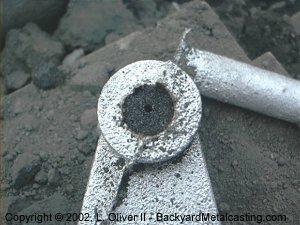 |
Here is a straight-on view of the baked sand core in the casting. The hole in the center of the core is the vent. All I need to do is scrape this core sand out (easy with a screwdriver) and there will be a nice straight bore through the casting. |
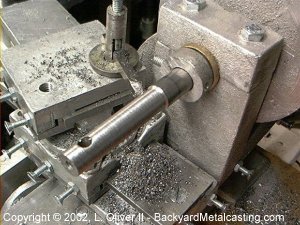 |
Here I'm turning down the end of the boring bar to fit in the tailstock's pre-cast hole to bore it out larger. |
 |
This is a shot of both parts of the tailstock together ready to be bored. In fact the boring bar is already extended into it, I guess it can't wait to start... |
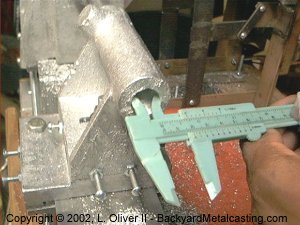 |
Here I'm measuring the bore with my measuring device (are these calipers?) They were a good price from my local dollar store... that's right one dollar. Glad they only cost a dollar, they weren't very accurate! Just as I mentioned with the headstock I didn't build D. Gingery's special cutter bit depth gauge. So I made cuts until it looked close to finished size then made miniscule adjustments to the bit. I DO NOT recommend this because it is way to easy to over bore the hole (but the method worked for me). |
I also didn't attach the tailstock to the carriage to drive it along the ways. I simply moved the carriage up to it and used it to push the tailstock past the bit, then I'd move the carriage back and pull (by hand) the tailstock back away from the bit. Then I'd adjust the cutter and do it over again. I didn't even install the power feed yet! | |
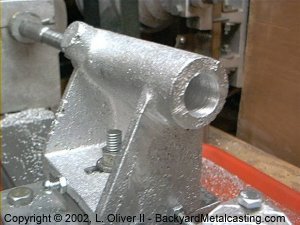 |
Here is the tailstock after boring. A nice clean hole ready for the ram. |
 |
This picture shows the beginning of when I used the lathe to put a 60° point on the temporary tailstock ram. |
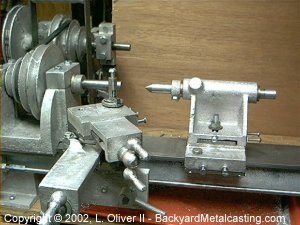 |
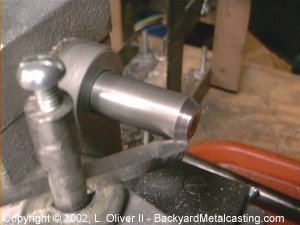
Here's a look at the complete tailstock with it's temporary ram. The setscrew on the ram is made from a piece of a sprue. |
www.backyardmetalcasting.com
Page contents copyright © 2002 by Lionel Oliver II
All Rights Reserved.