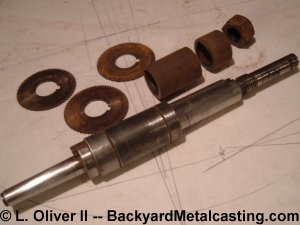
Here's an easy project. I'm cleaning the surface rust off the arbor. Actually the rust was on the spacer rings that align the cutters. A quick sanding with fine sandpaper (220 grit) removes the rust without damaging the good steel. Then a wire brushing will polish them afterward. I decided to use the manual method of sanding and wire brushing the steel clean instead of electrolytic rust removal for one main reason. The electrolytic method seems to leave steel more prone to re-rusting.
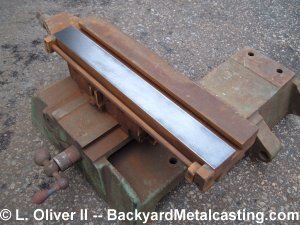
As you can see half of the work table's top has been sanded clean. Once again I used 220 grit sand paper and then used a wire brush to polish it a bit. This only took about 10 minutes maybe a little less. Only half of the table is clean in this photo for comparison.

Here is a closer look at the worktable surface after cleaning. Notice that neither the fine sandpaper nor the wire brush damages the iron. The only real flaws are the tiny pits left by the rust but the iron feels smooth and slick when rubbing your fingers across it.
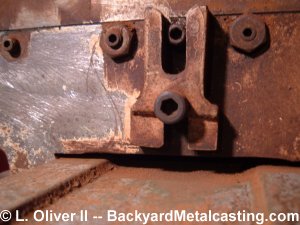
From this photo you can see that a lot of what looks like rust is actually just dirty paint. I scraped some of it off from this area just below the front of the worktable. I intend to remove most of the remainder with a chemical paint stripper.
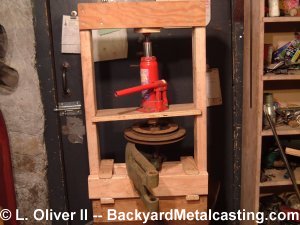
Here is a homemade wooden hydraulic press. The reason for it is that the countershaft spindle was extremely tight in the bearings and would barely spin. I didn't want to risk breaking the casting or damaging the spindle so instead of hammering the spindle out I decided to use a hydraulic press to gently push it out the bearings (bronze bushings). Being that I didn't have a hydraulic press and had no regular use for one I decided to slap together this rig from wood I had laying around. It worked splendidly but I'm sure a "real" press would have been much more convenient. But this new tool is a welcomed addition for my occasional needs for it. I have a page about the press.
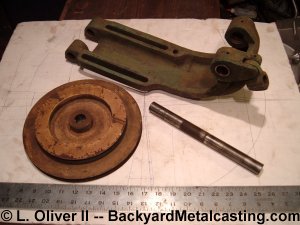
Here are the dissasembled parts of the countershaft after pushing the spindle out on the wooden press. The motor platform is not shown here since I wasn't working on that at the time. Notice the surface rust on the center of the spindle. There was a lot more of it but I sanded it away with the 220 grit sandpaper. After I sanded and polished the entire spindle and the insides of the bearings (bushings) it slid into them and rotated very smoothly.
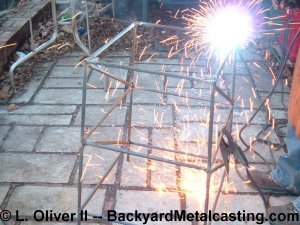
Here I'm welding together a worktable for the machine to sit on. As usual I'm building with my favorite material... steel rebar. CAUTION: This photo was taken with the camera on a tripod using the automatic timer. Do not attempt to manually photograph a welding arc! Eye damage could result.
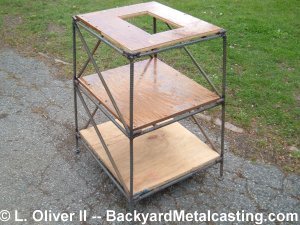
Here is the finished worktable (it can use some extra wire brushing and paint though). This photo was taken right after I finished the table which was about 4 months after the photo of me welding it shown above. That's the usual case for me, I work on something off and on as I feel motivated... The lower shelves are for the mill's tooling and stuff, but will probably end up storing junk. The top shelf has a hole in it so I can reach under the machine to access the bolts that attach the column to the base. Steel rails support the underside of each shelf. This was built with over 40 feet of rebar rod. It is totally stable and fairly heavy also.
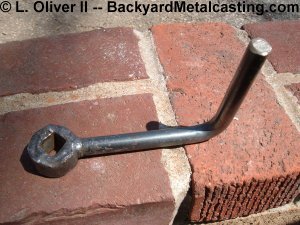
The machine was missing the original feed handle for the z-axis (up and down) and the x-axis (left and right) so here is one that I made for the machine. The mill's feed screws have a 1/2" square end for the handle to slide onto. I made the square socket by welding together a box from steel strap then I slid the box into a section of pipe and welded the box into the pipe. A simple handle was then welded on to finish it off. It's ugly but easy to make and works well.
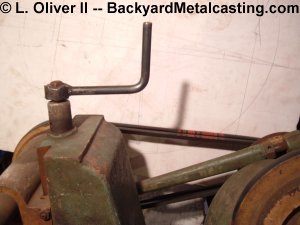
Here is the feed handle on the z-axis leadscrew. The mill's head moves up and down with great ease and is very stable. Feel free to continue to Part 4 Or return to Part 2.